Start closing more deals
No credit card required

Headset configuring steps in the service and possible problems with access in this article. Connect your headset to your computer before starting setup.
A good connection is important when dealing with clients. Therefore, it is recommended to use a USB headset for calls. A list of headsets that have been verified by users is available in the Recommended Headsets section.
A good connection is important when dealing with clients. Therefore, it is recommended to use a USB headset for calls. A list of headsets that have been verified by users is available in the Recommended Headsets section.
Automatic Connection Test
If the test was successful, proceed to the test call.
If the system indicates errors, correct them before proceeding with the test call.
If the system indicates errors, correct them before proceeding with the test call.
We recommend you test your connection every time before you start calling customers. To run an automatic connection test, go to Name ➞ Settings ➞ Headset Set-Up.

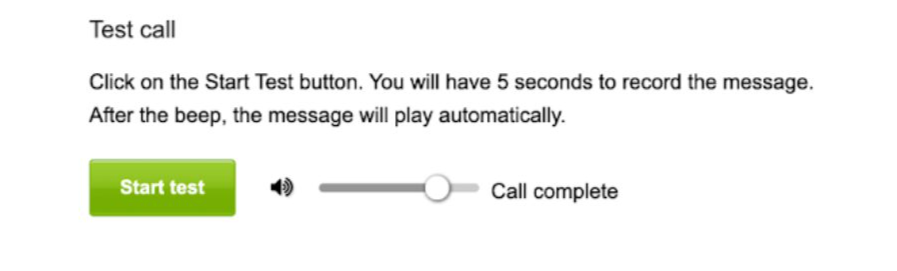
Test call
If the test was successful, proceed to the test call.
If the system indicates errors, correct them before proceeding with the test call.
If the system indicates errors, correct them before proceeding with the test call.
We recommend you test your connection every time before you start calling customers. To run an automatic connection test, go to Name ➞ Settings ➞ Headset Set-Up.
Possible Problems
- The headset is not connected to the computer
- Access to the microphone in the browser
- Old browser version
- Other problems: echo, noise, quiet sound
Headset is not connected to computer
1) Headset connection and serviceability:
- It is permissible to use only a headset and a microphone for calls;
- Check if the headset is connected to the computer;
- The headset must be connected directly to the computer without the use of adapters;
- If the headset has 2 wires (microphone and headphones), check that both are connected to the appropriate jacks;
- Check the sound controller on the headset (maybe the sound is muted on the headset remote);
- Test the headset on another computer.

2) Headset settings in the operationg system:
- Open the sound options by right-clicking on the speaker icon on the taskbar or by open Settins - System - Sound
- The Sound page includes two sections separating the output and input options. At the top of the page, you'll find your output options.
- Using the Choose your output/input device drop-down menu, you can quickly change the speakers/microphone you want to use as the default.

3) Set the microphone as the input device for the browser.
Open device and app volume settings (Under "Other sound options," click the App volume and device preferences option.). Set the volume to 90 - 100 for the browser and select the input device Headset microphone.
Open device and app volume settings (Under "Other sound options," click the App volume and device preferences option.). Set the volume to 90 - 100 for the browser and select the input device Headset microphone.

4) Set the microphone as the input device for the browser.
6) Check the quality of communication through the standard program "Voice Recording" (Start → Voice Recording) for extraneous sounds, interference and hum.
- Use the Windows search box to navigate to Microphone privacy settings
- Switch on the Allow apps to access your microphone toggle for BlueJeans to access your microphone
6) Check the quality of communication through the standard program "Voice Recording" (Start → Voice Recording) for extraneous sounds, interference and hum.
How to Enable the Microphone and Camera in Google Chrome
You need to allow access to the microphone in the browser. Instructions for commonly used browsers can be found below.
Google Chrome
Click on the camera icon in the right corner of the address bar → Allow Selmo to access the microphone → Click "Settings" to go to the microphone selection → Select the headset microphone.
Mozilla Firefox
When you go to the headset page or when you try to make a call, allow access to the microphone or adjust the permission through the browser menu. Browser menu → Settings → Privacy and security → Permissions → Microphone → Options → Insert website link https://app.selmo-pro.com/
Old browser version
Update your browser version to use the service. In the browser settings, you will find version information and you can update it. Typically, when you enter a version information page, the browser will automatically trigger an update.
Google Chrome
Browser menu → Help → About Google Chrome browser
Mozilla Firefox
Browser menu → Help → About Firefox
Google Chrome
Browser menu → Help → About Google Chrome browser
Mozilla Firefox
Browser menu → Help → About Firefox
Other problems
Echo or headphone noise
- Disable listening from the microphone. Sound Options → Sound Control Panel → Recording → Select Microphone → Listen → Uncheck "Listen to this device"
- Reduce the microphone sensitivity to 70-80. Sound Options → Sound Control Panel → Recording → Select Microphone → Levels
- Mute other microphones in the "Ready" status with a right-click.
Quite sound or silent microphone
- Check the volume level of the microphone in the system
- If Skype is installed, turn off automatic sound settings. Tools → Preferences → Sound settings and uncheck the automatic microphone and speaker settings
Interrupted or cracking sound
- Check the internet speed and stability
After the problems are fixed, run the automatic test again and make a test call. If you can't solve the problem on your own, write to the service support.